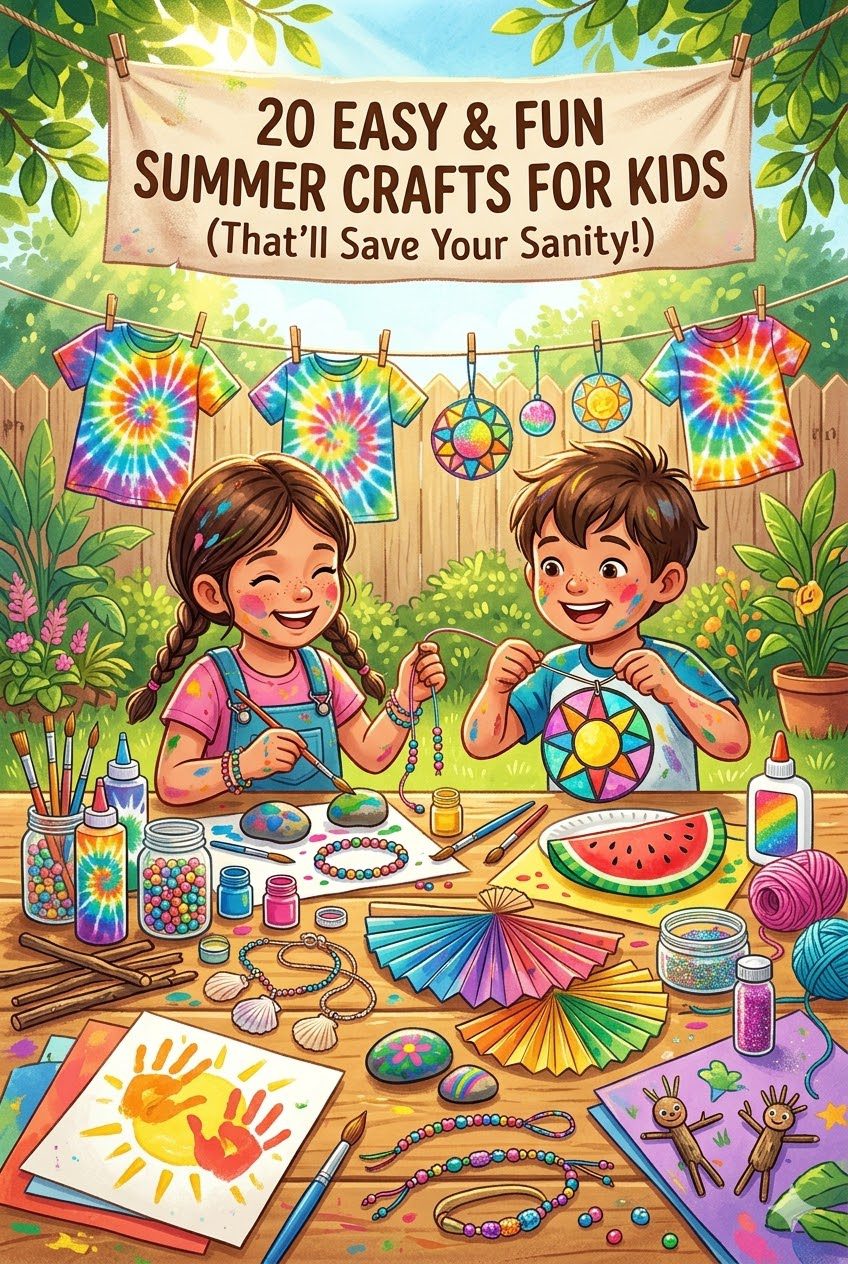
Summer break sounds dreamy — until day three when the kids have already exhausted every screen, every snack, and every ounce of your patience. Sound familiar? Here’s the thing: easy summer crafts for kids are the ultimate secret weapon. They’re cheap, they’re creative, and they keep little hands busy long enough for you to drink a hot coffee. Miraculous, I know.
I’ve tested (and survived) more kids’ craft sessions than I care to count — birthday parties, rainy afternoons, the infamous “I’m bored” summer spiral. These 20 fun summer crafts for kids cover every age group, every budget, and every mess tolerance level. Some are gloriously tidy. Others… less so. I’ll warn you either way.
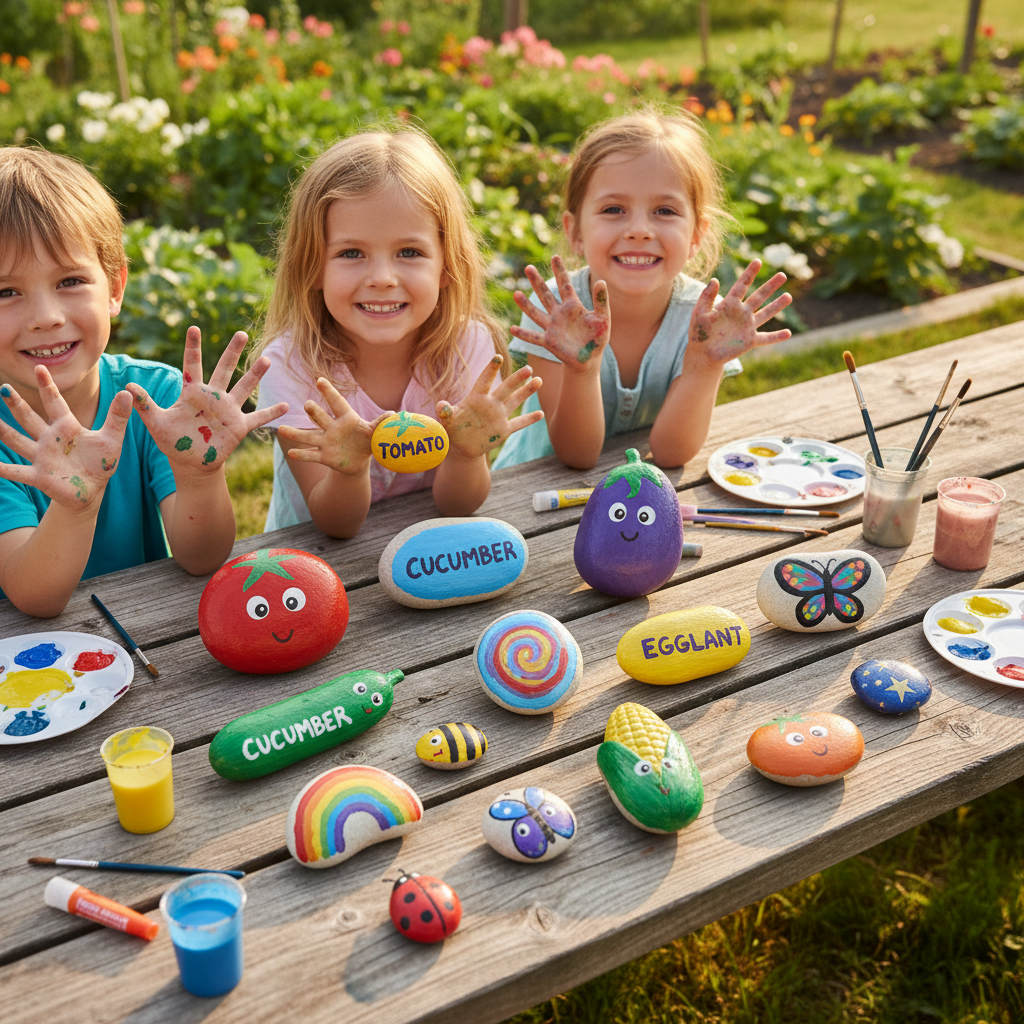
1. Painted Rock Garden Markers
Why It’s Awesome
Rocks + paint + a garden = the most satisfying craft that actually serves a purpose. Kids love seeing their art displayed outside all summer long.
What You’ll Need
- Smooth, flat rocks (collected on a walk or bought cheaply)
- Acrylic craft paint in assorted colors
- Black paint pen for lettering
- Outdoor Mod Podge to seal
Step-by-Step Instructions
- Wash and dry rocks completely.
- Paint the base color and let dry for 20 minutes.
- Paint the vegetable or herb name on each rock (tomato, basil, mint, etc.).
- Add fun designs — stripes, dots, flowers — whatever the kids dream up.
- Seal with Mod Podge once fully dry.
Why You’ll Love It
These make a genuinely useful garden accessory and kids are so proud when they spot their markers outside every day. I made these with my cousin’s kids last July and those rocks are still in her herb garden. Longevity rating: 10/10.
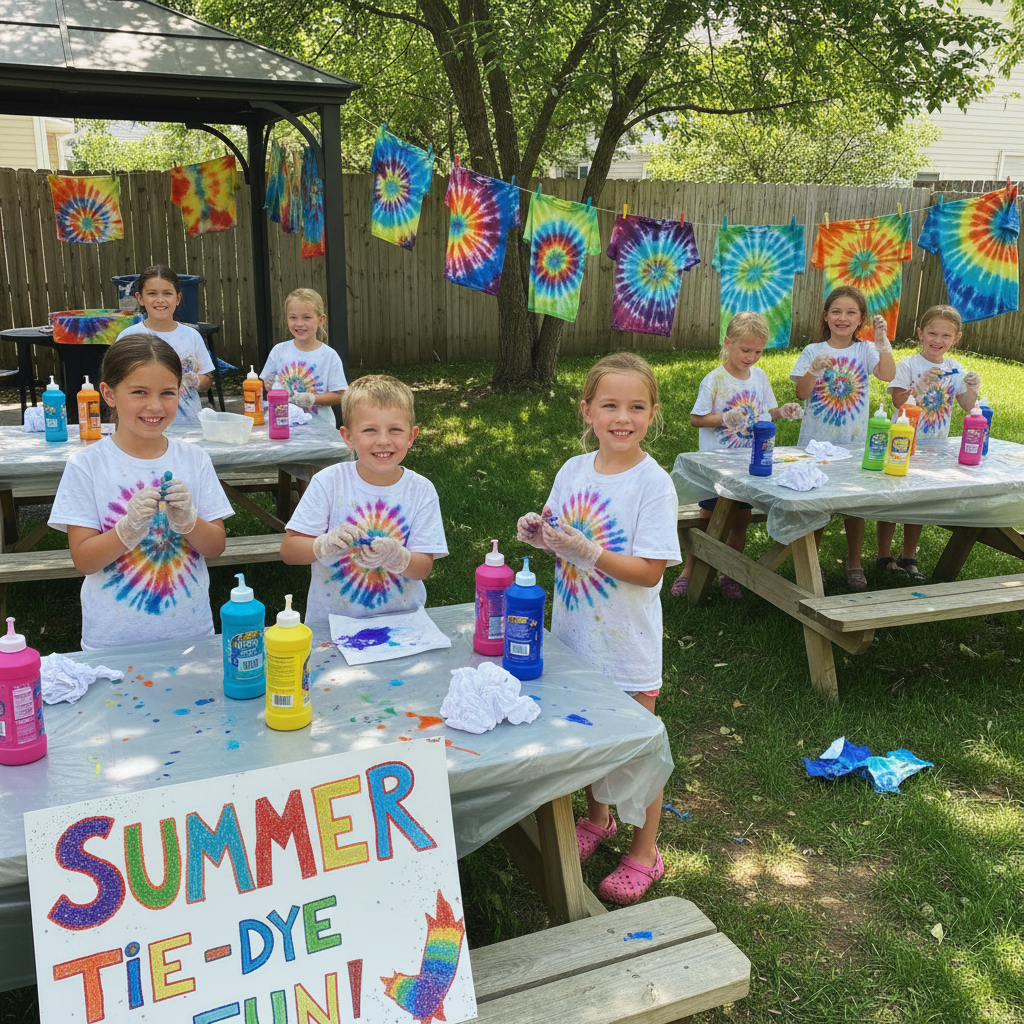
2. Tie-Dye T-Shirts
Why It’s Awesome
A certified summer classic and honestly one of the most fun summer crafts for kids of any age. Warning: it gets messy. Gloriously, wonderfully messy.
What You’ll Need
- White cotton T-shirts (pre-washed)
- Tie-dye kit (or individual fabric dye bottles)
- Rubber bands
- Plastic gloves and a plastic tablecloth
Step-by-Step Instructions
- Dampen the shirt with water.
- Twist, fold, or scrunch sections and secure with rubber bands.
- Apply dye colors to each section — no rules, just vibes.
- Wrap in plastic wrap and let sit 6–8 hours (overnight is better).
- Rinse in cold water, remove rubber bands, and wash separately before wearing.
Why You’ll Love It
Every shirt turns out completely unique, which kids absolutely love. FYI, spiral patterns are the easiest to nail on the first try — start there if you’re crafting with younger kids.
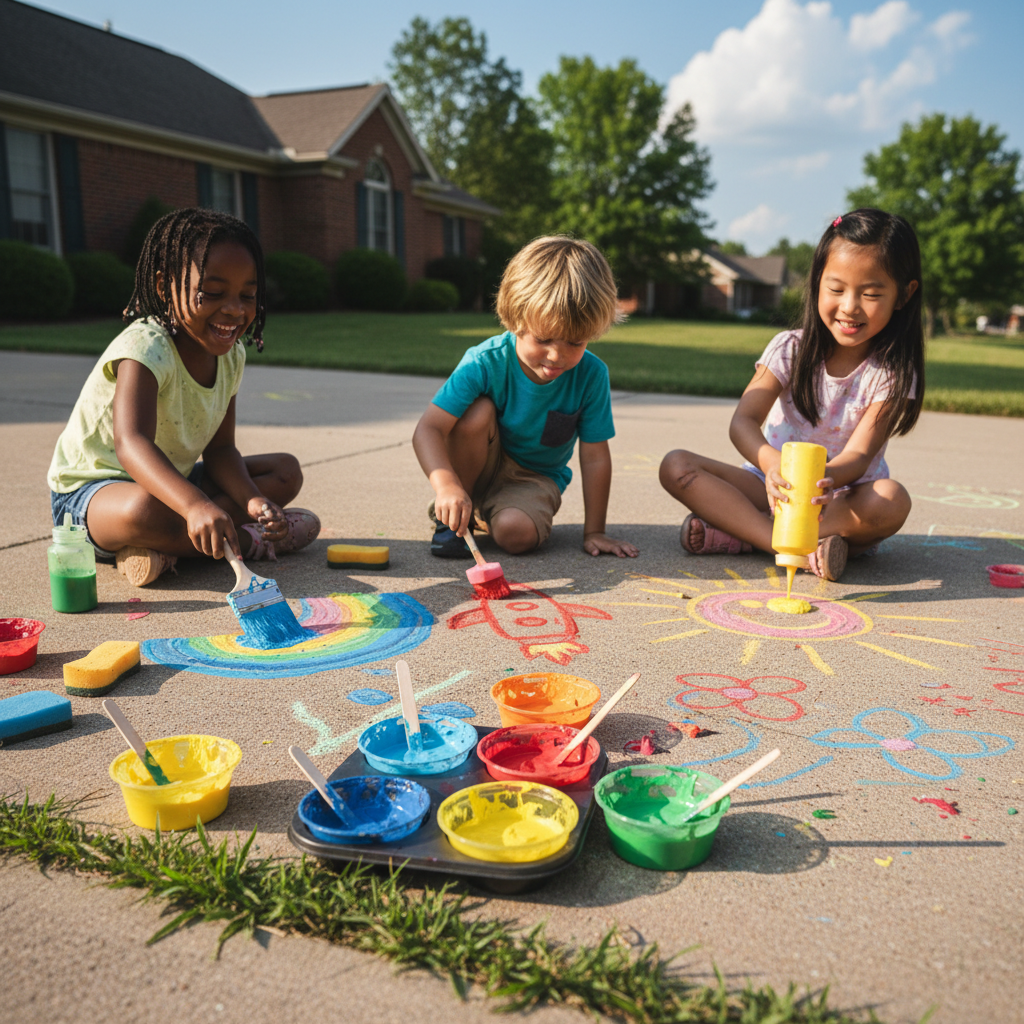
3. Homemade Sidewalk Chalk Paint
Why It’s Awesome
Skip the store-bought chalk and make a liquid sidewalk paint that dries bright and bold — then disappears with the next rain. Zero cleanup guilt.
What You’ll Need
- Cornstarch (1 cup per color)
- Water (1 cup per color)
- Food coloring or liquid watercolors
- Muffin tin or small cups
- Paintbrushes (cheap ones — they stain)
Step-by-Step Instructions
- Mix equal parts cornstarch and water in each cup.
- Add 10–15 drops of food coloring and stir well.
- Head outside with paintbrushes and let kids paint the driveway or patio.
- Let art dry in the sun for a vivid, chalk-like finish.
- Rinse away with a hose when done or after the next rain.
Why You’ll Love It
This is hands-down one of the easiest summer crafts for kids under 5. It costs almost nothing and the “clean up” is literally rain. Someone should give this craft an award.
4. Sunprint (Sun Art) Paper Craft
Why It’s Awesome
Use actual sunlight to create art. Science! Creativity! Summer! This craft hits all three in under 20 minutes.
What You’ll Need
- Sunprint paper (cyanotype paper — cheap on Amazon)
- Leaves, flowers, keys, feathers — any flat objects
- A tray of water
- Direct sunlight
Step-by-Step Instructions
- Arrange flat objects on a sheet of sunprint paper in direct sunlight.
- Leave for 2–5 minutes until the paper turns white under the objects.
- Slide the paper into a tray of water and rinse for one minute.
- Remove, pat dry, and watch the image develop into a bold blue-and-white print.
Why You’ll Love It
Kids are genuinely mesmerized by this. The reveal when the image develops is pure magic — their little faces light up every single time. IMO this is the most “wow” craft on the entire list.
5. Bird Feeder from a Pinecone
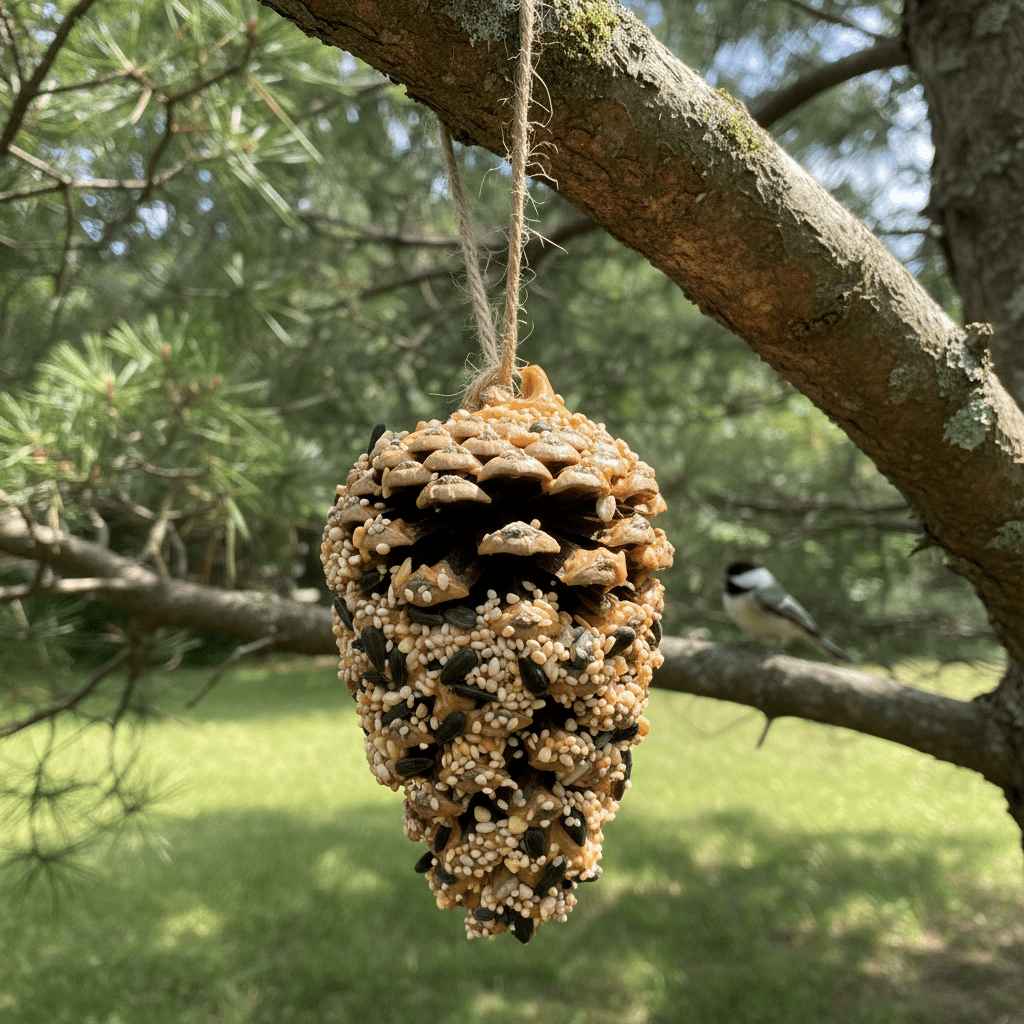
Why It’s Awesome
A zero-waste, wildlife-friendly summer craft that takes 10 minutes and keeps delivering joy all season long as birds show up to feed.
What You’ll Need
- Large pinecone
- Peanut butter (or sunflower butter for nut-free homes)
- Birdseed
- Twine or string
Step-by-Step Instructions
- Tie twine around the top of the pinecone for hanging.
- Spread peanut butter generously over the pinecone scales using a spoon or butter knife.
- Roll the pinecone in birdseed until fully coated.
- Hang from a tree branch and wait for the birds to arrive.
Why You’ll Love It
This is the craft that keeps giving. Kids check their bird feeder daily, start recognizing bird species, and suddenly you’ve accidentally launched a birdwatching obsession. Worth it.
6. Paper Plate Sun Craft

Why It’s Awesome
Simple, cheerful, and perfect for ages 3–6. This sunny summer craft for toddlers takes under 15 minutes and looks adorable on any wall.
What You’ll Need
- Paper plates
- Yellow and orange paint
- Googly eyes
- Strips of yellow construction paper for rays
- Glue stick
Step-by-Step Instructions
- Paint the paper plate yellow and let dry.
- Cut or tear strips of yellow and orange construction paper into ray shapes.
- Glue rays around the back edge of the plate.
- Add googly eyes and a drawn-on smile with marker.
- Punch a hole and hang with string.
Why You’ll Love It
Toddlers go wild for googly eyes — fact. This one is mess-light and fast, which makes it perfect for hot afternoons when attention spans are already running on fumes.
7. Watercolor Resist Butterflies
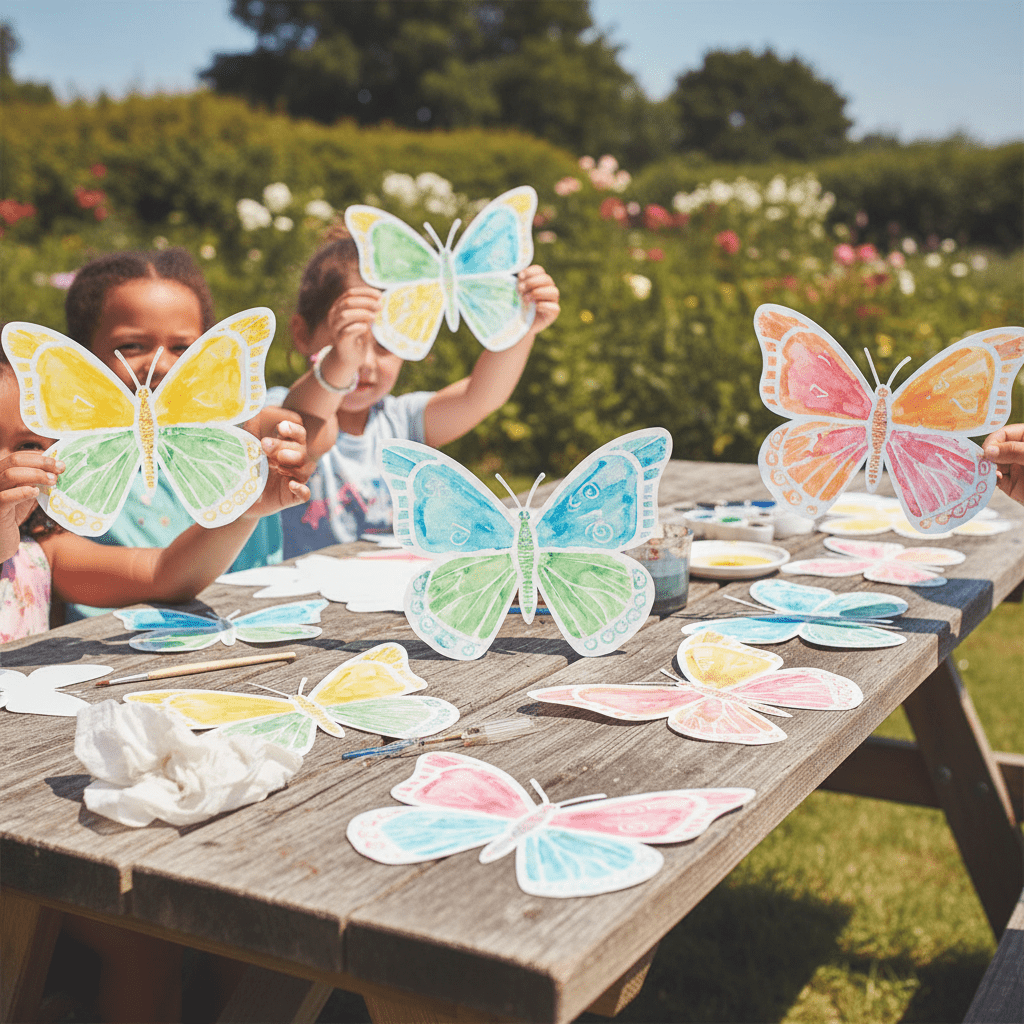
Why It’s Awesome
Crayon + watercolor = a stunning resist effect that looks way more impressive than the effort required. Kids feel like professional artists and honestly? They should.
What You’ll Need
- White cardstock
- White crayon
- Watercolor paints
- Paintbrush and water
Step-by-Step Instructions
- Draw butterfly wings on cardstock using a white crayon — press firmly.
- Paint over the entire sheet with watercolors in bright summer shades.
- Watch the butterfly wings “resist” the paint and appear like magic.
- Let dry fully and cut out if desired.
Why You’ll Love It
The reveal moment when the white crayon lines appear through the watercolor never gets old. I’ve done this craft with kids as young as 4 and as old as 11 — every single age group loves the magic of it.
8. DIY Wind Chimes from Recycled Materials
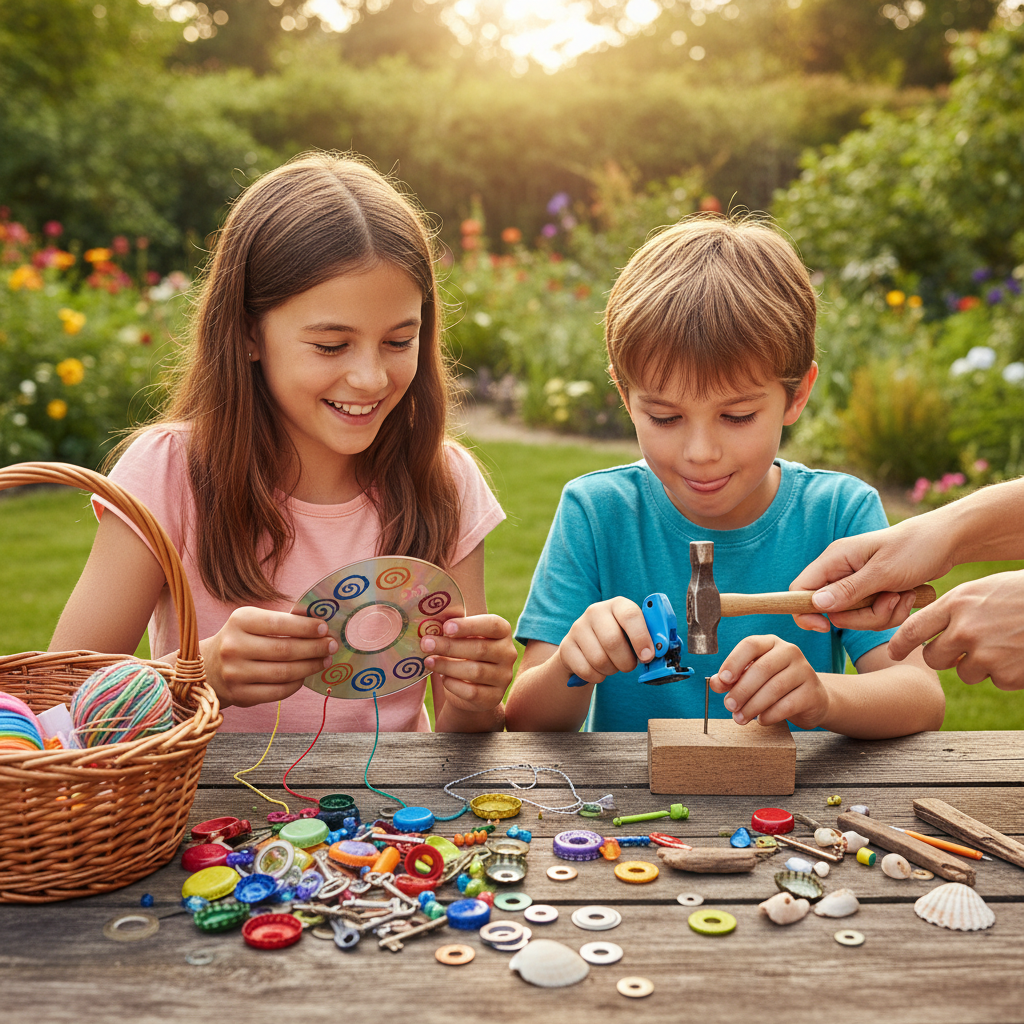
Why It’s Awesome
Raid the recycling bin and turn junk into a genuinely musical outdoor decoration. Eco-friendly summer crafts that make noise? Kids are absolutely here for it.
What You’ll Need
- Old keys, bottle caps, shells, or beads
- A stick or wooden dowel
- Twine or fishing line
- Acrylic paint (optional)
Step-by-Step Instructions
- Paint the stick or dowel if desired and let dry.
- Cut 5–7 lengths of twine, each slightly different in length.
- Thread and knot shells, keys, or bottle caps onto each strand.
- Tie each strand to the stick, spacing evenly.
- Attach a hanging loop and find a breezy outdoor spot.
Why You’ll Love It
No two wind chimes turn out the same, which kids love. Hang them on a porch or near a window and they’ll run outside to listen every time the breeze picks up 🙂
9. Leaf Print Tote Bag
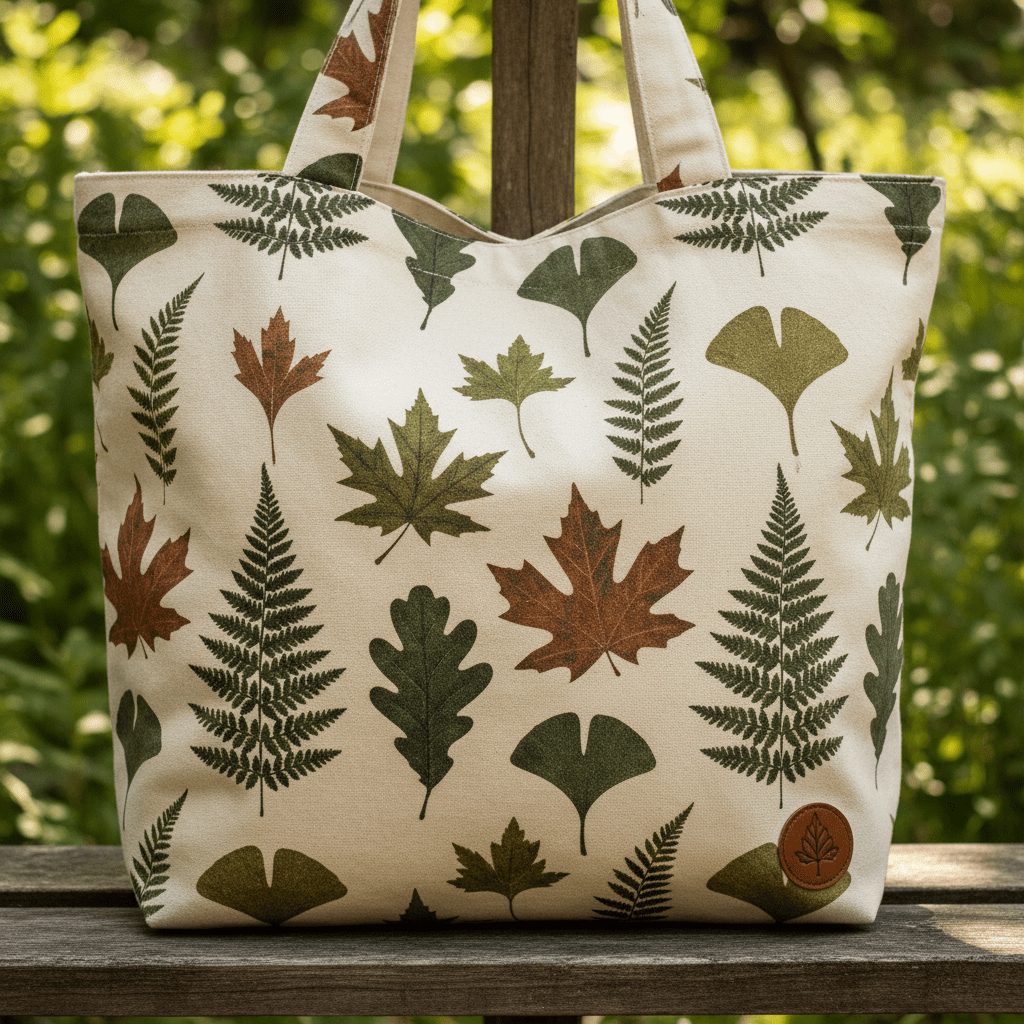
Why It’s Awesome
Grab leaves from the backyard, dip them in paint, and stamp a tote bag into something genuinely beautiful. This one doubles as a back-to-school accessory — functional and crafty.
What You’ll Need
- Plain canvas tote bag
- Leaves in various shapes and sizes
- Fabric paint in assorted colors
- A foam brush or sponge
Step-by-Step Instructions
- Lay the tote bag flat on a covered surface.
- Brush fabric paint onto the underside of each leaf.
- Press the painted leaf firmly onto the bag, then peel back carefully.
- Repeat with different leaves and colors until the design feels complete.
- Let dry 24 hours, then heat-set with an iron per paint instructions.
Why You’ll Love It
Every leaf print is slightly different, so the final bag looks like one-of-a-kind art. Kids use these for beach trips, the library, snack bags — suddenly everything needs to go in their leaf bag.
10. Popsicle Stick Picture Frames
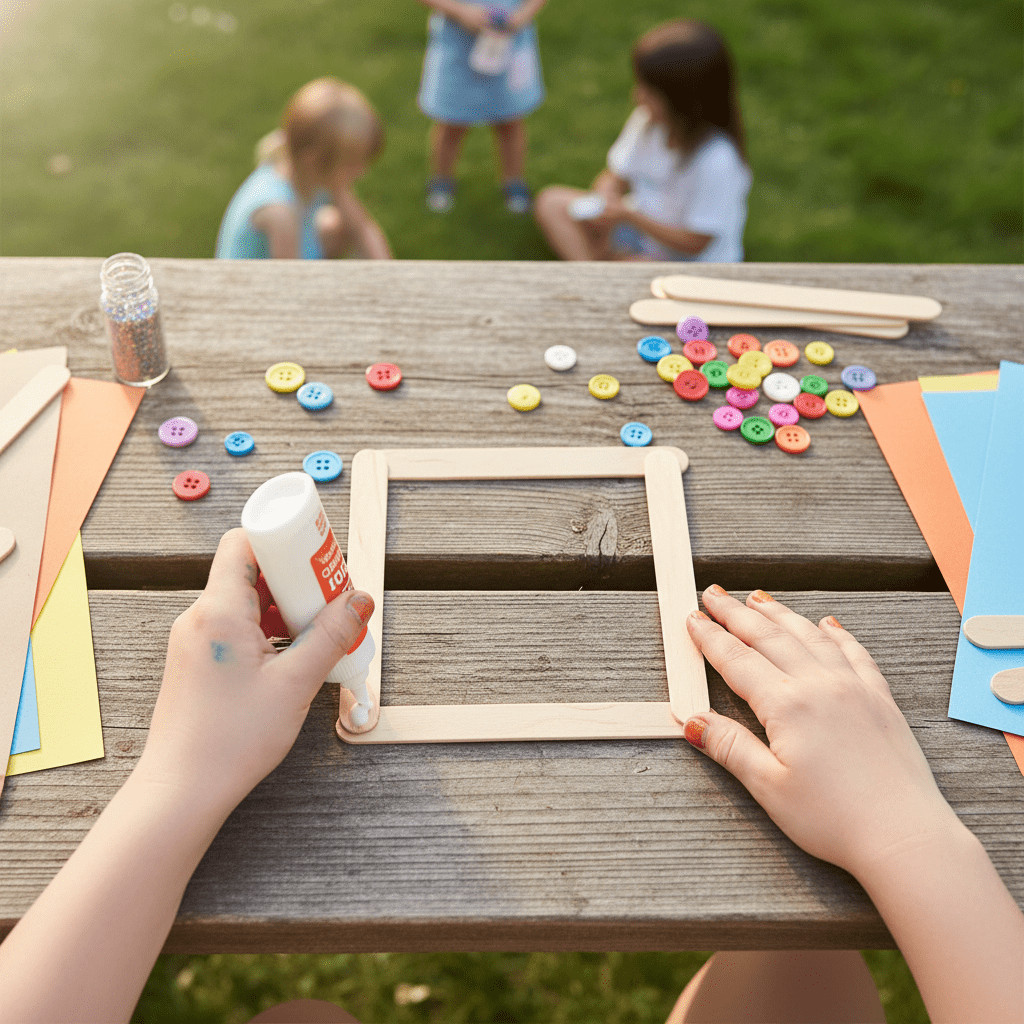
Why It’s Awesome
Popsicle sticks + glue + paint = a photo frame that makes grandparents cry happy tears. Guaranteed.
What You’ll Need
- Popsicle sticks (8–10 per frame)
- Craft glue or hot glue (adult-supervised)
- Acrylic paint and glitter
- A favorite printed photo
Step-by-Step Instructions
- Lay 4 popsicle sticks in a square, overlapping the corners.
- Glue the corners together and let dry completely.
- Decorate with paint, glitter, stickers, or markers.
- Glue the photo to the back and add a ribbon for hanging.
Why You’ll Love It
These make the sweetest handmade gifts — for grandparents, teachers, or to keep as a summer memory. Buy popsicle sticks in bulk (they’re pennies each) and make a whole batch.
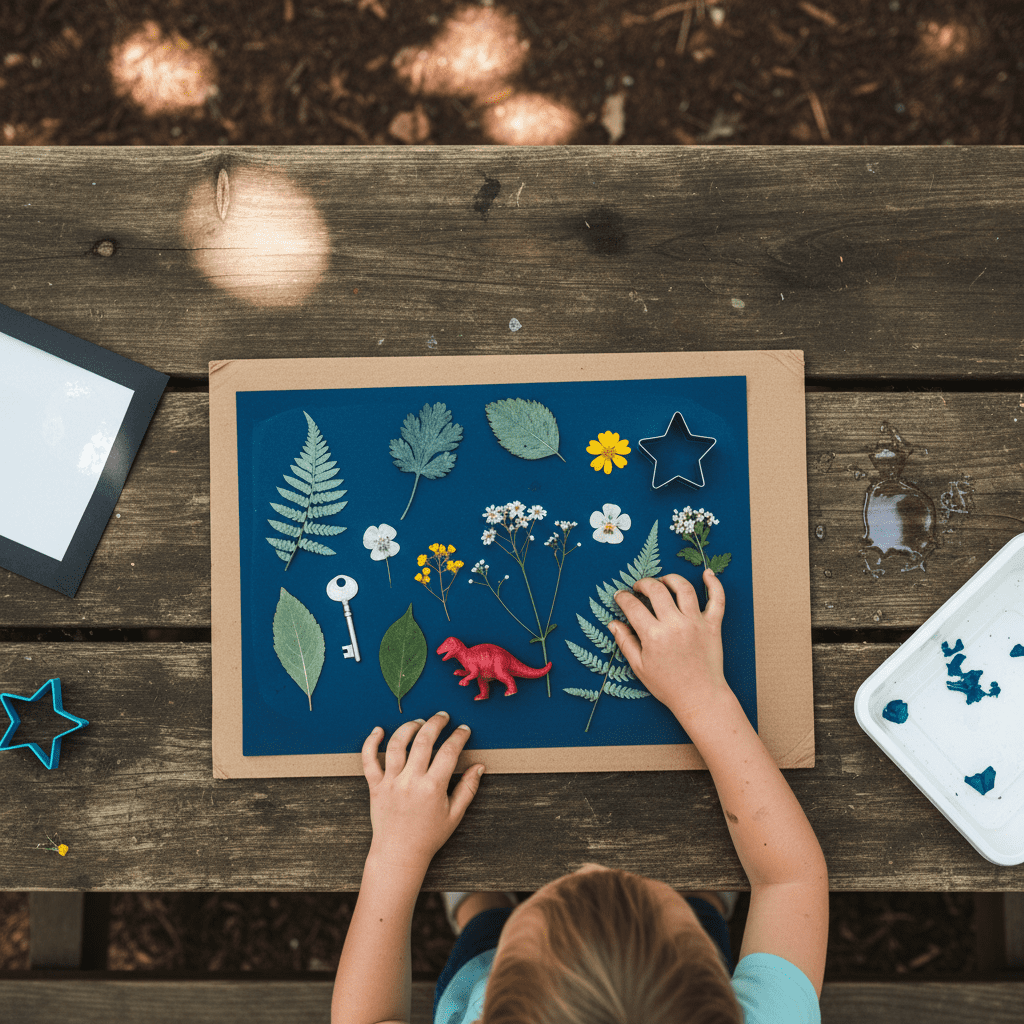
11. Nature Collage Art
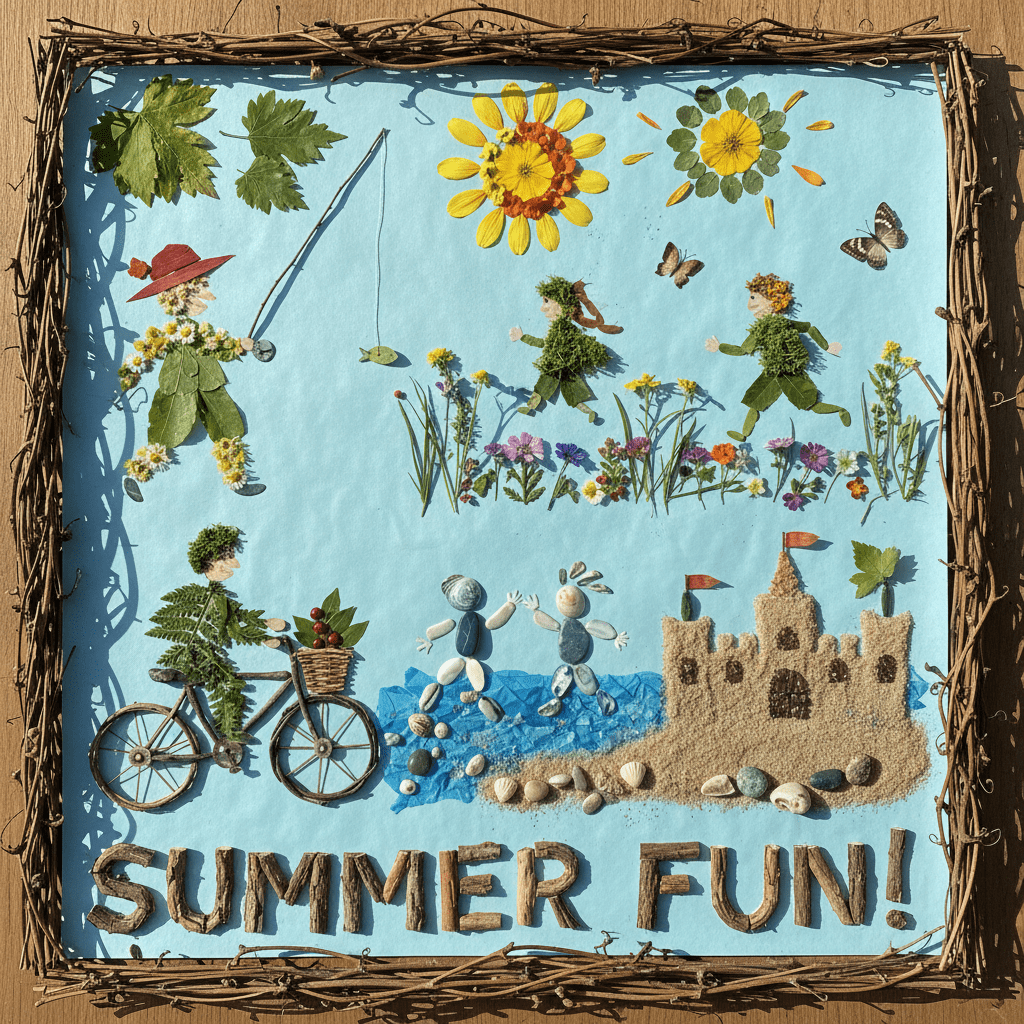
Why It’s Awesome
Collect flowers, leaves, twigs, and seeds on a walk, then arrange them into a collage. It’s basically outdoor scavenging + art in one — double the activity, double the fun.
What You’ll Need
- Collected nature items (pressed flowers, leaves, seeds, bark)
- Cardstock or a canvas board
- PVA glue or Mod Podge
- Optional: watercolor background
Step-by-Step Instructions
- Paint a watercolor background wash and let dry (optional but stunning).
- Arrange collected nature items into a scene or abstract design.
- Glue each piece down using PVA glue.
- Seal the entire collage with Mod Podge once fully dry.
Why You’ll Love It
This craft teaches kids to see art in everyday natural objects. My favorite version I’ve ever seen had a tiny pressed daisy as the sun over a twig landscape. Framed and everything. Pure magic.
12. DIY Friendship Bracelets
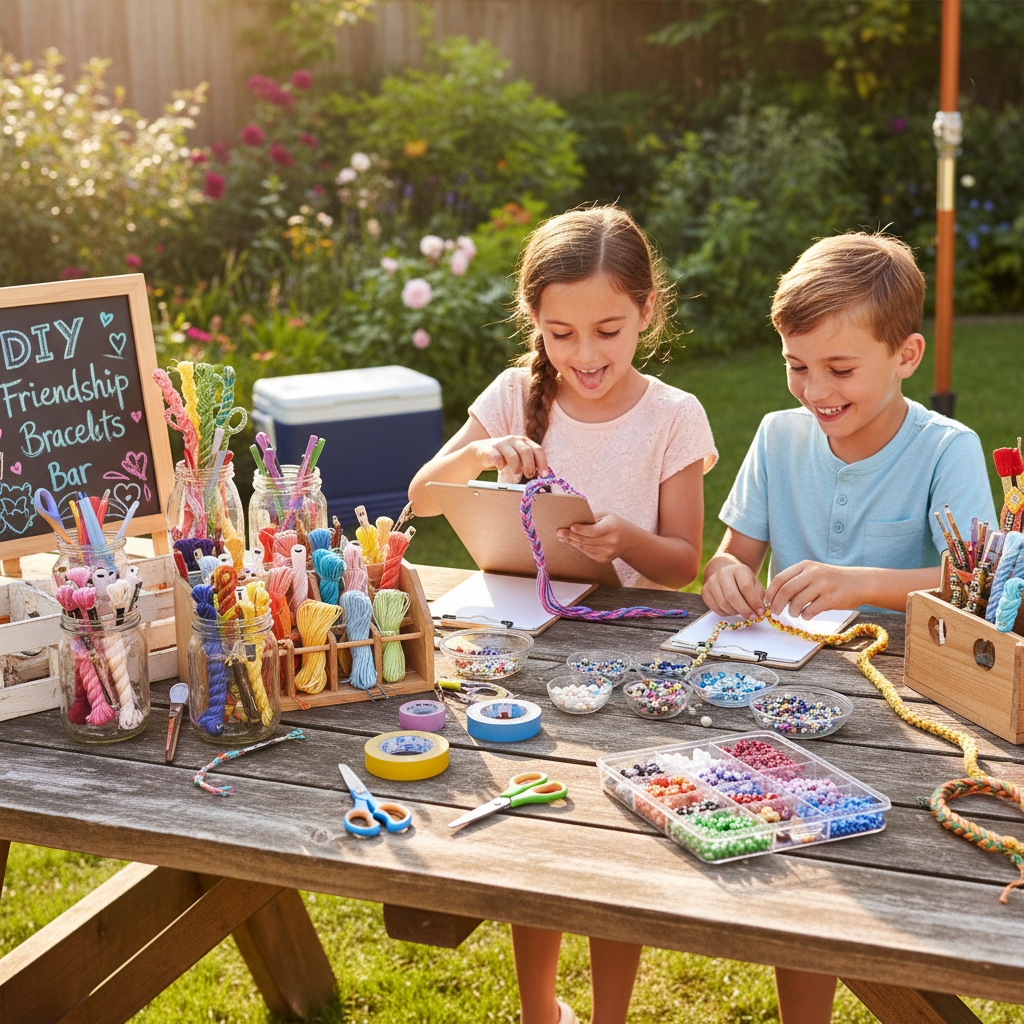
Why It’s Awesome
A timeless summer craft for kids ages 7 and up that builds fine motor skills, pattern recognition, and friendships all at once. What’s not to love?
What You’ll Need
- Embroidery floss in multiple colors
- Tape or a clipboard to anchor the bracelet
- Scissors
Step-by-Step Instructions
- Cut 4–6 strands of embroidery floss, each about 24 inches long.
- Tie all strands together with a knot at one end and tape to a hard surface.
- Braid or knot in your chosen pattern — chevron and candy stripe are easiest for beginners.
- Continue until the bracelet fits around the wrist.
- Tie off the end and exchange with a friend.
Why You’ll Love It
Once kids learn one pattern they want to make approximately 400 bracelets. Stock up on embroidery floss early — you’ll thank yourself by week two of summer.
13. Stamped Bug Art with Vegetables
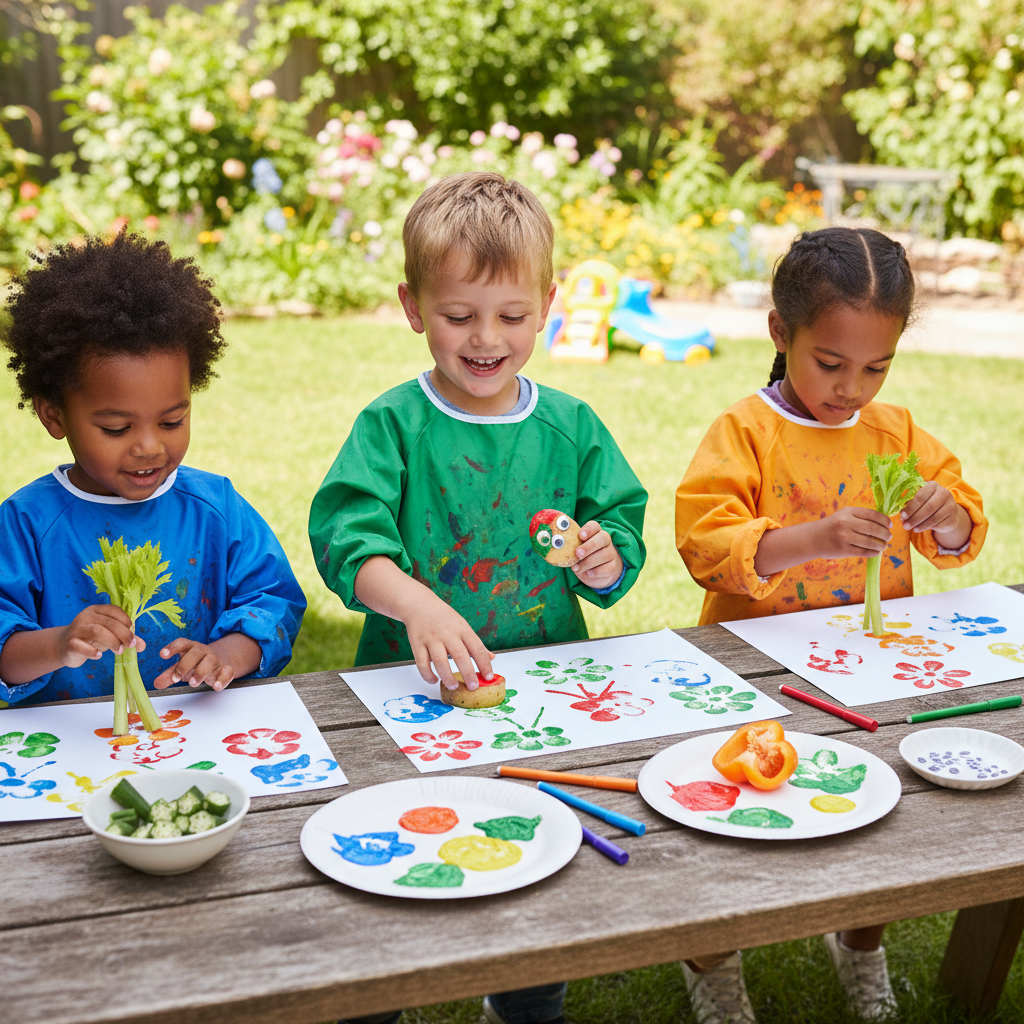
Why It’s Awesome
Cut a celery stalk crosswise, dip in paint, and stamp a perfect rose. Cut an apple in half and stamp a flower. Produce becomes art. Kids become geniuses.
What You’ll Need
- Celery stalks, apples, bell peppers, corn cobs
- Tempera or acrylic paint in bright colors
- White cardstock
- Paper plates for paint palettes
Step-by-Step Instructions
- Cut vegetables and fruit into stamp-friendly shapes and sizes.
- Pour paint onto paper plates.
- Dip the cut side of each vegetable into paint and press firmly onto cardstock.
- Build a scene — bugs, flowers, abstract patterns, whatever the kids dream up.
- Let dry and display.
Why You’ll Love It
A corn cob rolled across paper makes the most satisfying texture pattern you’ve ever seen. This is one of those summer crafts for kids that looks so good you’ll want to frame it — and sometimes you absolutely should.
14. Bubble Wrap Printed Ocean Art
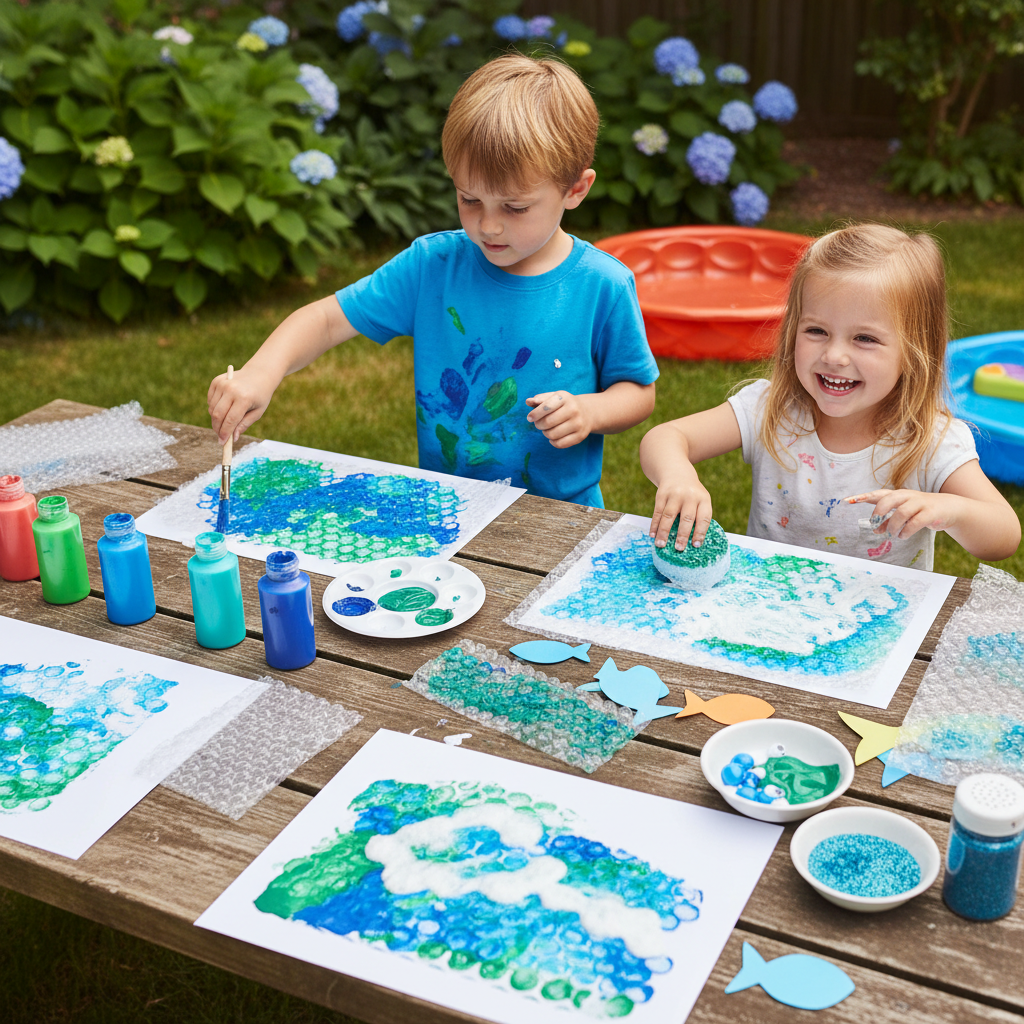
Why It’s Awesome
Bubble wrap + blue paint = a texture that looks exactly like ocean waves. It’s satisfying to make, gorgeous to display, and the bubble wrap popping is a bonus reward.
What You’ll Need
- Bubble wrap (save from packages!)
- Blue, green, and white tempera paint
- Large white paper or canvas
- Foam brush
Step-by-Step Instructions
- Brush blue and green paint onto the bubble wrap surface.
- Press the painted side firmly onto the paper.
- Peel back slowly to reveal the ocean texture.
- Add white paint highlights for wave foam.
- Let dry, then add cut-out fish, boats, or sea creatures on top.
Why You’ll Love It
The texture is genuinely stunning and every single print turns out differently. Layer two or three prints for depth. Kids feel like real painters — because they are.
15. Mason Jar Firefly Lanterns
Why It’s Awesome
Turn mason jars into glowing summer lanterns perfect for backyard evenings. Use battery-powered fairy lights to keep it kid-safe and parent-approved.
What You’ll Need
- Clean mason jars
- Yellow and green tissue paper torn into small pieces
- Mod Podge
- Battery-powered fairy lights
Step-by-Step Instructions
- Brush Mod Podge onto the outside of the jar.
- Press torn yellow and green tissue paper pieces over the glue, overlapping slightly.
- Brush another layer of Mod Podge over the top to seal.
- Let dry completely (2–3 hours).
- Drop fairy lights inside and turn on at dusk.
Why You’ll Love It
These look incredible on a porch or picnic table at night. Kids take enormous pride in lighting them up as the sun goes down. Make a whole set for a backyard movie night — instant atmosphere.
16. Suncatcher Craft with Contact Paper
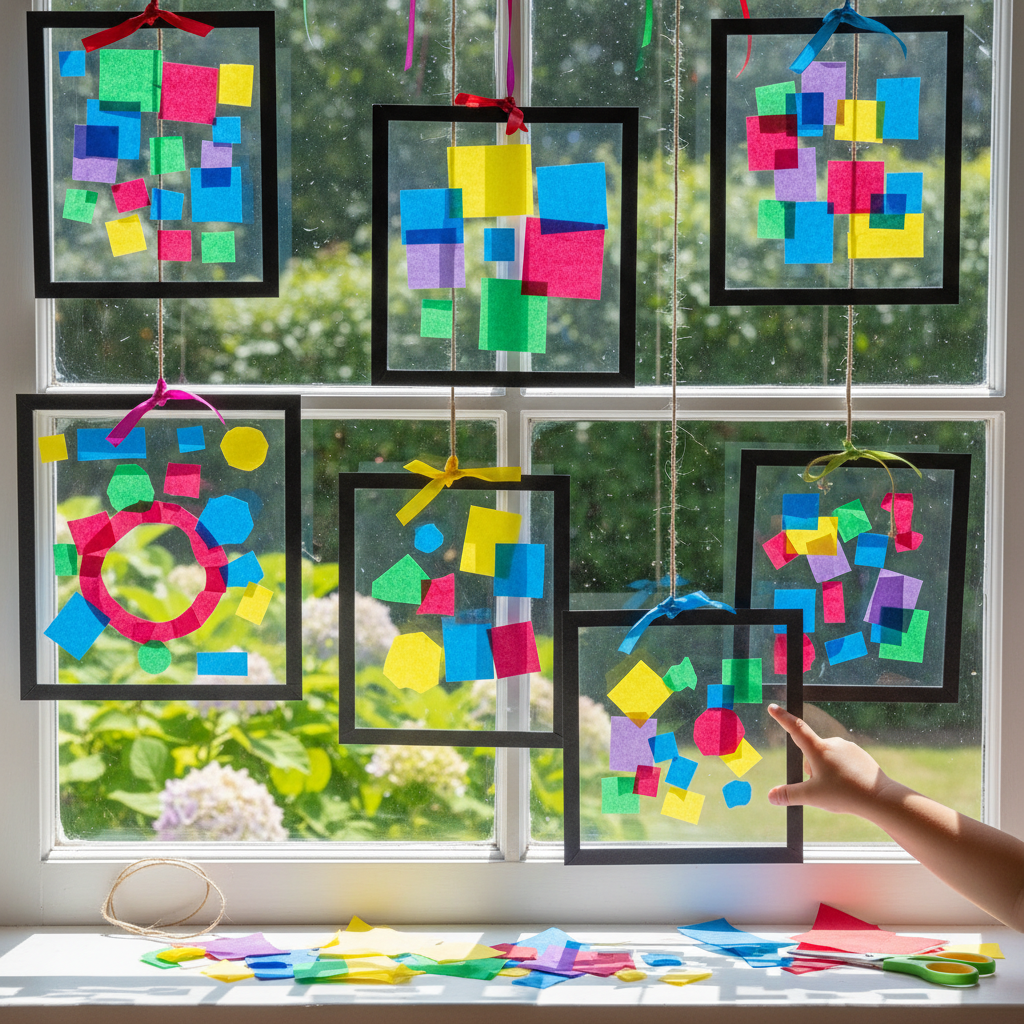
Why It’s Awesome
Stick translucent tissue paper and flat items to contact paper, hang in a window, and watch the light pour through. Stunning results, zero artistic skill required.
What You’ll Need
- Clear contact paper
- Tissue paper scraps in bright colors
- Pressed flowers or leaves (optional)
- Scissors and a hole punch
Step-by-Step Instructions
- Cut two equal squares of contact paper.
- Peel the backing from one piece and lay sticky-side up.
- Press tissue paper pieces and flat nature items onto the sticky surface.
- Peel the backing from the second piece and press sticky-sides together to sandwich the art.
- Trim edges, punch a hole, and hang in a sunny window.
Why You’ll Love It
Sunlight through colored tissue paper creates a stained-glass effect that genuinely looks like real art. This is the craft I recommend most often to teachers and camp counselors — it works every single time.
17. Handprint Summer Animals
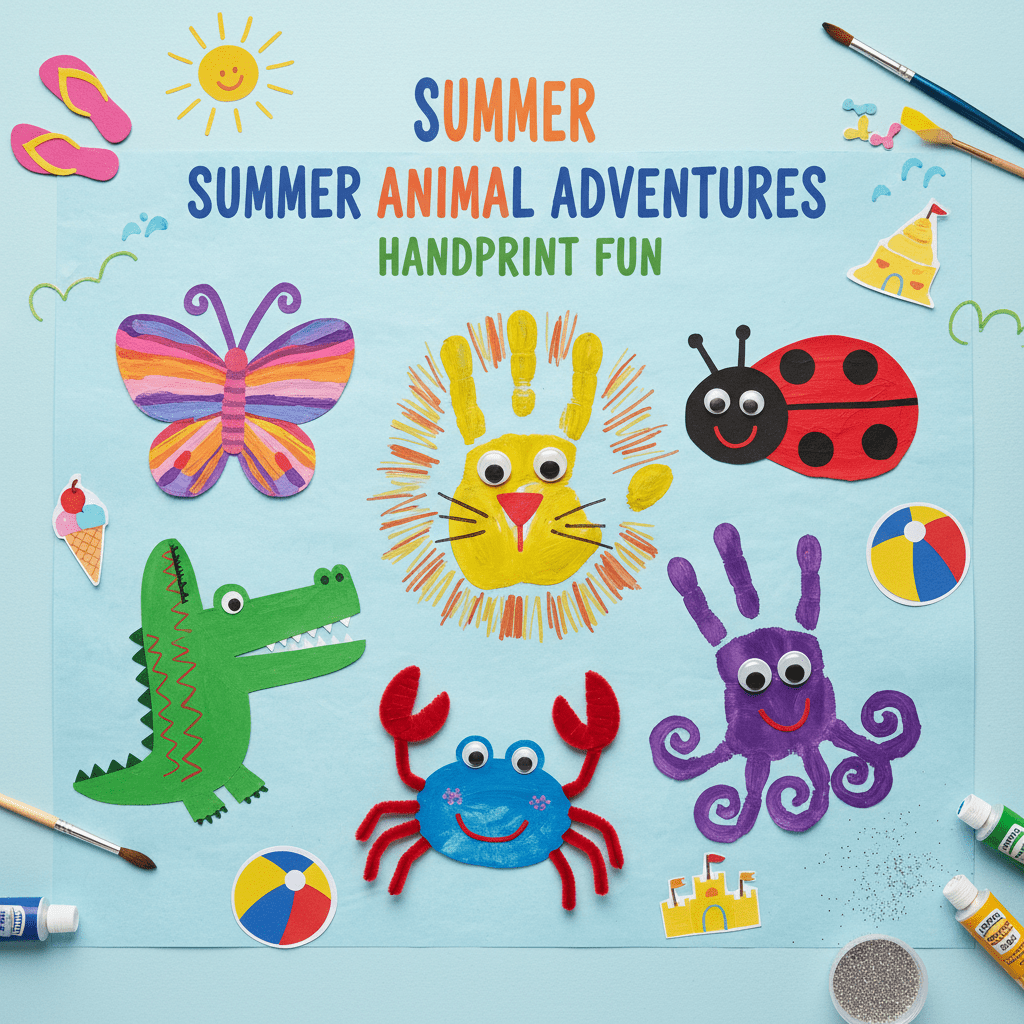
Why It’s Awesome
A handprint turned into a crab, a flamingo, or a sunflower — these never go out of style and they double as the sweetest keepsakes to look back on years later.
What You’ll Need
- Tempera or washable paint in various colors
- White cardstock
- Black marker for details
- Baby wipes for speedy cleanup
Step-by-Step Instructions
- Paint the child’s hand in the desired color (pink for flamingo, red for crab, etc.).
- Press firmly onto cardstock and peel back carefully.
- Let dry fully.
- Add details with a black marker — eyes, legs, feathers, claws.
- Write the child’s name and date on the back.
Why You’ll Love It
Date every single one of these. Seriously. You’ll thank yourself in five years when you pull them out and cannot believe how tiny those hands once were :/
18. DIY Kite from a Trash Bag
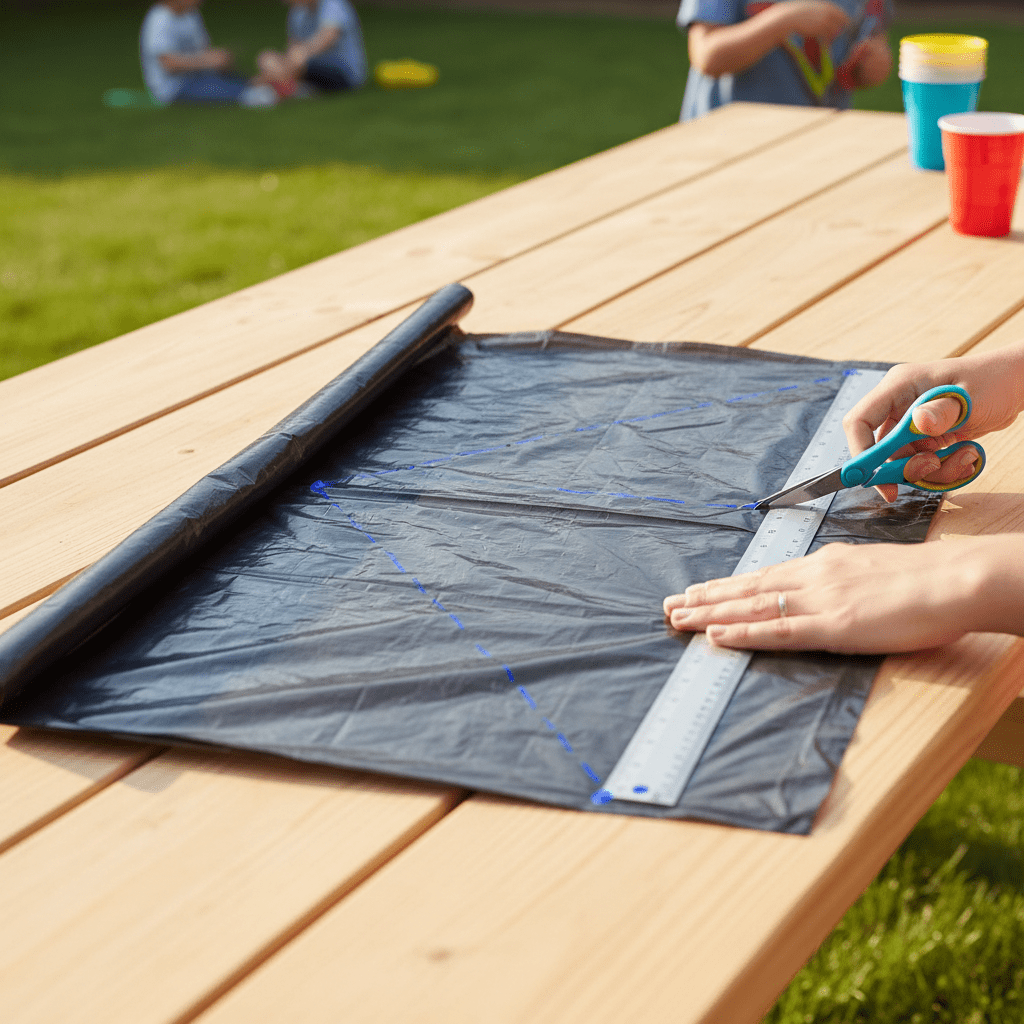
Why It’s Awesome
A functioning kite made from a garbage bag and two sticks? Yes, really. This easy summer craft for kids actually flies — and the pride kids feel is absolutely unmatched.
What You’ll Need
- Large plastic trash bag
- Two thin wooden dowels (one longer, one shorter)
- String or twine
- Tape and scissors
Step-by-Step Instructions
- Cross the dowels in a “t” shape and tie together with string at the center.
- Cut the trash bag open and lay flat.
- Stretch the bag over the frame and tape or tie the corners down.
- Attach a long string to the center cross point.
- Find an open space and run — the kite will lift on its own.
Why You’ll Love It
This is the craft where everything leads to an activity. Make it, then immediately take it to the park to fly it. Kids will talk about their homemade kite for the rest of the summer.
19. Pressed Flower Bookmarks
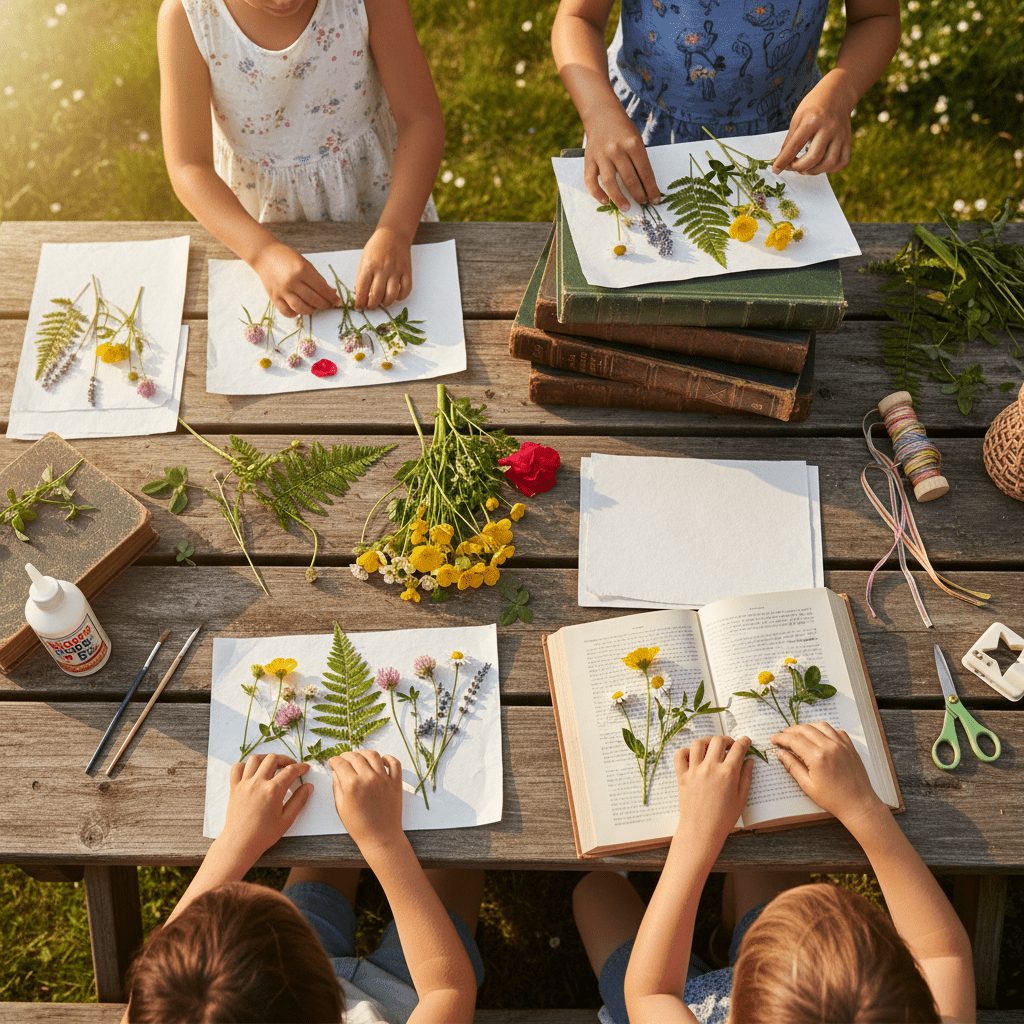
Why It’s Awesome
Collect flowers, press them flat, and laminate them into the prettiest bookmarks you’ve ever seen. Simple, beautiful, and it sneaks in a love of reading. Win-win.
What You’ll Need
- Fresh flowers and small leaves
- Heavy books for pressing
- Cardstock strips cut to bookmark size
- Self-adhesive laminating sheets or a laminator
- Glue stick
Step-by-Step Instructions
- Press flowers between the pages of a heavy book for 1–2 weeks until flat and dry.
- Cut cardstock into bookmark strips (roughly 2 x 7 inches).
- Arrange pressed flowers on the cardstock and glue down.
- Laminate using self-adhesive sheets or a laminator.
- Punch a hole at the top and add a ribbon or tassel.
Why You’ll Love It
These make gorgeous gifts and kids feel genuinely accomplished making something this polished. Start pressing flowers at the beginning of summer and by July you’ll have a beautiful collection to work with.
20. Tie-Dye Coffee Filter Butterflies
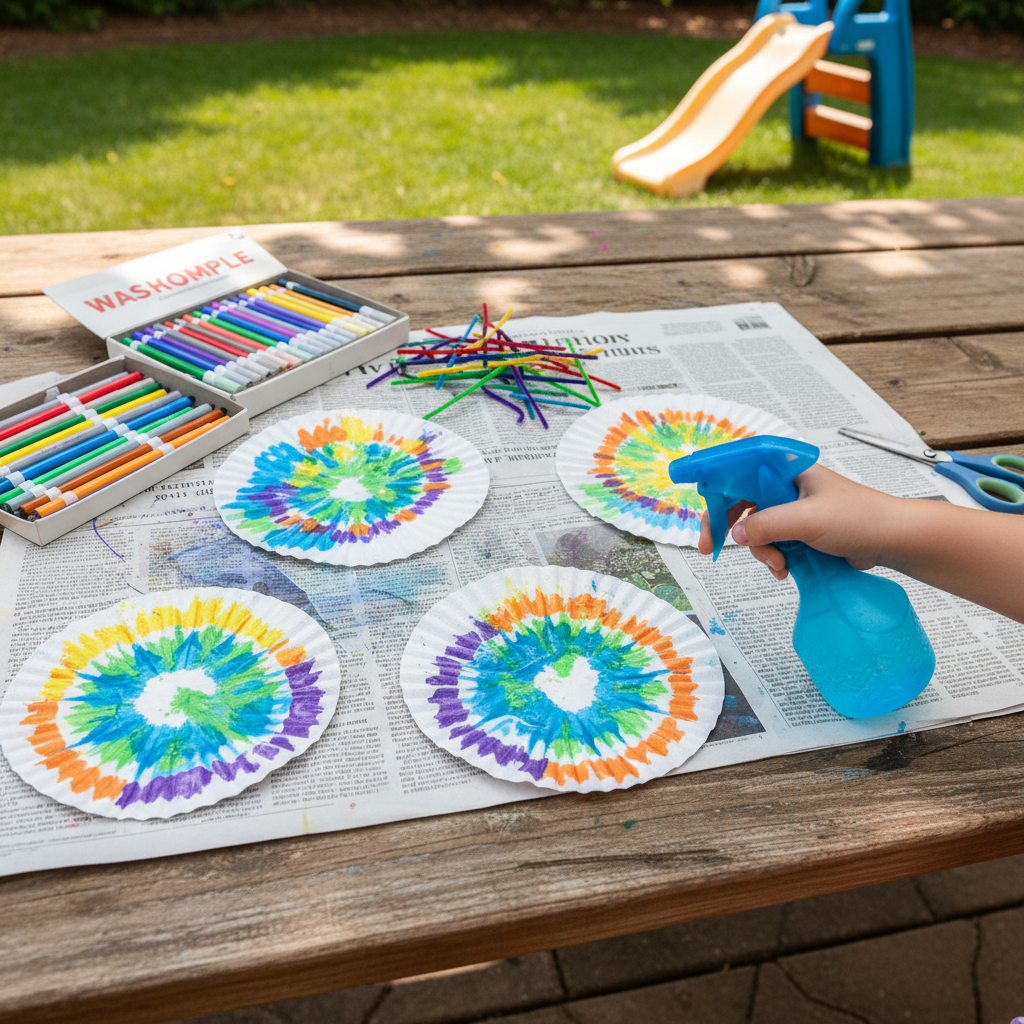
Why It’s Awesome
Coffee filters + markers + a spritz of water = the easiest, most dazzling summer craft for kids. No fabric dye required, no mess to regret.
What You’ll Need
- White basket-style coffee filters
- Washable markers in bright colors
- A spray bottle with water
- Pipe cleaners for the butterfly body
Step-by-Step Instructions
- Color the flat coffee filter heavily with washable markers — no white space left behind.
- Lay flat on a protected surface and spritz lightly with water.
- Watch the colors bleed and blend into each other (this is the best part).
- Let dry completely.
- Pinch the center and twist a pipe cleaner around the middle to form wings and antennae.
Why You’ll Love It
The color-blending moment when the water hits the marker is genuinely magical — kids ask to do it over and over again. Make a whole garden of butterflies and hang them from a window or bulletin board. Absolutely stunning.
That’s a Wrap on Summer Crafts!
There you have it — 20 easy and fun summer crafts for kids that cover every age, every budget, and every mess threshold you’re personally comfortable with. From five-minute coffee filter butterflies to weeklong pressed flower projects, there’s something here for every kind of creative kid.
The best part? Most of these summer crafts use supplies you already have at home or can grab for a few dollars. No specialty store runs, no complicated techniques, no craft degree required. Just good materials, willing hands, and a surface you don’t mind getting a little painty.
Pick three or four favorites, stock up on the supplies, and you’ve got a whole season of creative afternoons sorted before the “I’m bored” chorus even begins. You’re welcome.